

Hockey is a thrilling and fast-paced sport that demands skill, dedication…and the proper protective gear.
The importance of wearing hockey gear correctly cannot be overstated, as it serves not only to enhance performance but also to ensure the safety of players on the ice.
With the physicality and potential risks involved in the game, proper gear is essential for protecting players from injuries that can occur due to collisions, falls, or impacts from pucks or sticks.
Properly wearing hockey gear involves a step-by-step process that ensures each piece is fitted correctly and provides the intended protection.
Starting with base layers to regulate temperature and moisture, players progress to securing protective cups or pelvic protectors and garter belts to hold up their hockey socks. Shin guards, hockey pants, and skates are then worn, providing protection to the legs and feet. Shoulder pads, elbow pads, jerseys, gloves, helmets, cages or face shields, and mouthguards complete the gear ensemble, providing comprehensive coverage and safeguarding vital areas.
This article will dig into how to properly wear and maintain your gear so that it protects you for many glorious seasons!
Let’s start by answering the question, “Why do you need to wear hockey equipment?”
Understanding The Importance of Hockey Gear
Understanding the significance of hockey gear is the first step towards maximizing its benefits.
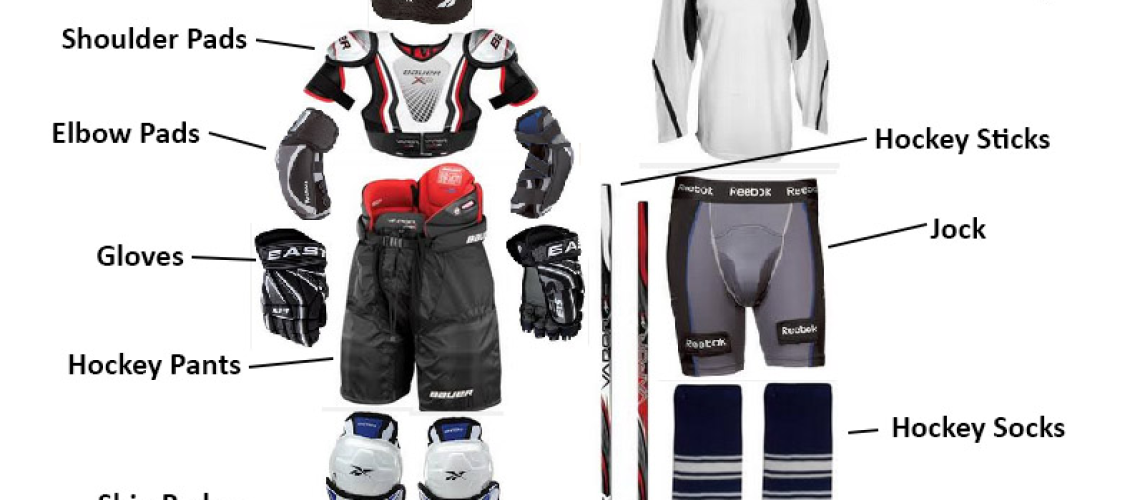
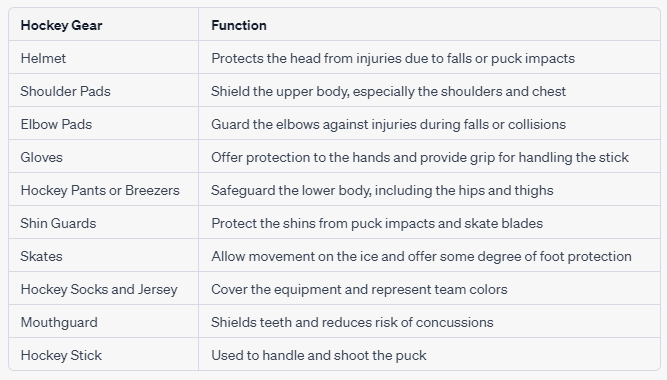
Each component of the gear serves a unique purpose in providing protection to specific areas of the body. From helmets that shield the head to shoulder pads, elbow pads, and shin guards that protect various parts of the upper and lower body, each piece is designed to absorb impacts and reduce the risk of serious injuries.
Gloves, hockey pants, skates, jerseys, mouthguards, and the hockey stick complete the ensemble, offering additional support, comfort, and representation of team colors.
Here’s a chart that describes the importance and function of each piece of hockey gear.
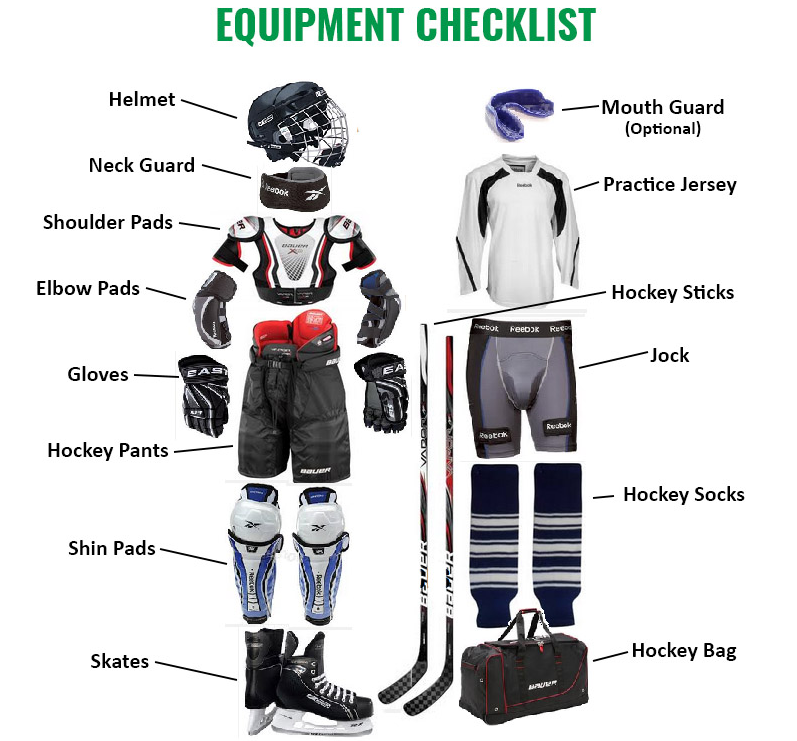
The Components of Hockey Gear
Hockey gear comprises several components, each serving a unique purpose.
The main elements include:
Steps to Wearing Hockey Gear Properly
Now that you’re familiar with the components of hockey gear, let’s dive into the steps to wear them correctly.
Step 1: Base Layers
Begin with your base layers, which are an essential foundation for wearing hockey gear properly.
Base layers are typically tight-fitting garments made from moisture-wicking materials that help keep you warm and dry on the ice. They serve as a crucial layer of insulation, regulating your body temperature and minimizing sweat buildup. When choosing base layers, opt for fabrics like polyester or synthetic blends that effectively wick away moisture and provide comfort during intense physical activity.
Make sure the base layers fit snugly, as they should sit close to your skin to maximize their thermal properties and prevent any uncomfortable bunching or chafing.
NOTE: Base layers soak up a lot of perspiration, but they don’t even come close to preventing your hockey gear from getting drenched with sweat. You will still need to sanitize and deodorize from time to time.
Step 2: Protective Cup and Garter Belt
The next step in wearing hockey gear properly is to wear a protective cup.
For male players, the cup is typically placed inside a jockstrap or compression shorts designed to hold it securely in place. This protective cup provides crucial protection for the groin area, reducing the risk of serious injuries. Female players, on the other hand, will wear pelvic protectors specially designed to provide similar protective benefits.
Once the protective cup or pelvic protector is in place, put on a garter belt. The garter belt is worn around the waist and is used to hold up your hockey socks in subsequent steps.
It ensures that the socks stay in place and don’t sag during gameplay, maintaining a professional appearance and preventing distractions.
Step 3: Shin Guards
Slide your feet into the shin guards, ensuring that they cover your legs from the bottom of the knee to the top of the foot.
Shin guards are crucial for protecting the shins from impacts, cuts, and bruises, which are common in hockey. They consist of hard plastic or foam padding enclosed in a durable shell, offering optimal protection against stray pucks, errant sticks, or contact with opponents.
When putting on shin guards, make sure they fit securely and provide adequate coverage. The guards should extend from just below the knee cap to the top of the skate, offering comprehensive protection for the entire shin area.
Properly fitted shin guards should allow for a comfortable fit while still providing ample mobility and range of motion.
Step 4: Hockey Socks
Pull the hockey socks over the shin guards and attach them to the garter belt to hold them in place.
Hockey socks serve both practical and aesthetic purposes. They are designed to be long enough to cover the shin guards completely, ensuring a seamless transition between the two components. Hockey socks are typically made of a durable and stretchable fabric, such as a nylon blend, to provide a snug and secure fit.
Pull the socks up snugly, ensuring they stay in place throughout the game or practice. Attaching them to the garter belt adds an extra layer of security, preventing them from sliding down or bunching up.
Besides holding all your stuff in place, properly worn hockey socks contribute to the overall professional appearance of the player, creating a unified team look on the ice.
Step 5: Hockey Pants (aka Breezers)
Put on your hockey pants, also known as breezers, after securing your base layers and shin guards.
Hockey pants provide protection to the lower body, covering the waist, hips, and thighs. They should fit snugly around your waist without being too tight or restrictive. The pants should extend from above your waist down to about halfway down your thigh, ensuring adequate coverage and protection. Adjust any straps or belt loops to achieve a secure and comfortable fit.
Properly fitted hockey pants allow for freedom of movement while offering the necessary padding and reinforcement to absorb impacts and reduce the risk of injuries.
Step 6: Skates
Lace up your skates properly for optimal support and performance on the ice.
Skates should be tight enough to offer stability and support to your ankles and feet but not so tight as to cut off circulation or cause discomfort. Begin by tightening the lower part of the skate, ensuring it is snug around your foot. Progressively tighten the laces as you move up the skate, ensuring a secure fit.
Double-check the laces to make sure they are evenly tightened and securely fastened. Properly laced skates provide the necessary stability for efficient skating and help prevent injuries such as ankle sprains or strains.
Once laced, give your skates a gentle tug to ensure they are secure and offer the desired level of support.
Step 7: Shoulder Pads
Put on your shoulder pads, ensuring they provide comprehensive coverage to your chest, back, and shoulders.
Shoulder pads are designed to absorb and distribute the impact from checks, collisions, or falls. They consist of hard plastic or foam padding that covers the vulnerable areas of your upper body. When putting on shoulder pads, make sure the front and back plates do not overlap, allowing for unrestricted movement.
Adjust any straps or closures to achieve a secure fit without hindering your mobility.
Properly fitted shoulder pads provide essential protection to crucial areas, reducing the risk of serious injuries such as fractures or contusions (serious bruises).
Step 8: Elbow Pads
Slide your arms into the elbow pads, ensuring they cover from the mid-bicep to the mid-forearm.
Elbow pads are designed to protect your elbows from impacts, falls, or collisions during gameplay. They consist of a hard outer shell and foam padding to absorb and disperse the force of impacts. When wearing elbow pads, make sure there is no gap between the pads and gloves, ensuring continuous protection.
Adjust any straps or closures to achieve a snug fit that doesn’t restrict movement or interfere with your ability to handle the stick effectively.
Properly worn elbow pads reduce the risk of painful injuries, such as fractures, dislocations, or contusions, and allow for confident play on the ice.
Step 9: Sweater (Jersey in the USA)
After properly wearing all the necessary protective gear, pull your sweater over your upper body equipment.
The jersey serves as the outermost layer and represents your team colors. It should be large enough to fit comfortably over the equipment without restricting movement or causing discomfort. Make sure the jersey is pulled down and properly aligned with the rest of your gear.
A well-fitted sweater not only contributes to the professional appearance of the player but also allows for unrestricted movement on the ice.
Step10: Gloves
Slip your hands into the gloves, ensuring they cover the wrist area and fit snugly but comfortably.
Gloves are essential for protecting your hands and providing a secure grip on the hockey stick. They should fit snugly to allow for optimal stick handling and control. Check that the gloves cover the entire wrist area without leaving any gaps.
Properly fitted gloves enhance dexterity, protect against impacts or slashes, and improve overall performance on the ice.
Take a moment to adjust the straps or closures to ensure a secure fit that doesn’t restrict hand movement.
Step 11: Helmet and Cage/Face Shield
Fasten the helmet on your head, ensuring a proper fit and secure positioning.
The helmet should sit one finger width above your eyebrows, providing adequate coverage and protection to your head. Fasten the chin strap, making sure it fits snugly under your chin to prevent the helmet from moving or falling off during gameplay.
If your helmet has a cage or face shield, ensure it is securely attached and properly aligned. The cage or face shield protects your face from potential impacts, flying pucks, or sticks.
Double-check that all the straps and buckles are tightened, providing maximum stability and protection for your head and face.
PRO TIP: Your helmet protects the most important part of you. Don’t go cheap on your brain bucket. Always buy a new one. You never know if a used one has compromised protectiveness through aging or excessive impact.
I’ve had more than my fair share of head contact with sticks, pucks, boards, elbows and the ice surface.
Every time it happens, I come away satisfied with my purchase and ready to suit up for another game…and happy that I can just go to work in the morning 😉
Step 12: Mouthguard
Last but not least, insert your mouthguard to protect your teeth and reduce the risk of concussions.
The mouthguard should fit securely and comfortably over your upper teeth, covering the entire dental arch. It should be properly molded to your teeth for optimal protection. Insert the mouthguard and ensure it stays in place throughout the game or practice.
A well-fitted mouthguard not only prevents dental injuries but also helps absorb and disperse the impact of hits to the jaw, reducing the risk of concussions.
Hockey Canada Video About Equipment Fitting
Here’s a video put out by hockey Canada for a visual guide to what we just described:
Maintaining Your Hockey Gear
Proper maintenance of hockey gear is crucial not only for the longevity of the equipment but also for ensuring its continued effectiveness in providing protection.
Here are some essential tips for properly maintaining hockey gear:
Air Out Your Gear
After each game or practice session, it’s important to allow your gear to properly dry out.
Hockey gear can accumulate moisture from sweat, which can lead to unpleasant odors and the growth of bacteria. Hang up your gear in a well-ventilated area, such as on a drying rack or outside in the fresh air, to allow proper airflow and facilitate drying.
This practice helps slow bacterial growth and reduce odors.
Clean Your Gear
Cleaning your hockey gear on a regular basis is essential for hygiene and odor control.
Most gear can be cleaned using a mild soap or sports gear cleaner. Follow the manufacturer’s instructions for cleaning each specific piece of equipment. Wipe down the hard surfaces, such as helmets and shoulder pads, and remove any removable padding or liners to clean separately.
It’s also a good idea to periodically wash your hockey socks, base layers, and jersey to keep them fresh and free from bacteria.
Here’s a detailed guide on how to wash your hockey gear at home: How To Clean Hockey Gear – THE ULTIMATE GUIDE
Check For Damage
Regularly inspect your gear for any signs of wear and tear or damage.
Look for frayed straps, loose stitching, or cracks in hard plastic components. Damaged gear may not provide the necessary protection and should be repaired or replaced as soon as possible. Pay particular attention to high-impact areas such as the helmet, shoulder pads, and shin guards.
By addressing any damage promptly, you can ensure your gear remains in optimal condition and provides the necessary protection during gameplay.
Store Your Gear Properly
Proper storage of hockey gear is important to maintain its shape and condition.
After cleaning and drying, store your gear in a cool and dry place, away from direct sunlight or extreme temperatures. Avoid leaving your gear in a confined and damp space, as this can promote bacterial growth and cause unpleasant odors. Consider using a dedicated gear bag or a well-ventilated equipment storage system to keep your gear organized and protected.
By following these maintenance practices and storing your gear properly, you can keep your hockey gear in top condition, ensuring its longevity and effectiveness in providing protection.
Properly maintained gear not only contributes to your safety but also enhances your overall enjoyment and performance on the ice.
Watch this news interview with Paul Boyer (Head Equipment Manager for the Detroit Red Wings) to see what he uses to sanitize and deodorize hockey gear at the 2 sports store locations that he owns.
Conclusion
Wearing hockey gear correctly is not only essential for performance but also paramount for the safety of players on the ice.
Each component of the gear plays a crucial role in protecting various parts of the body from potential injuries. By understanding the importance of each piece and following the proper steps to wear them, players can significantly reduce the risk of harm while maximizing their performance potential.
The process of wearing hockey gear properly involves attention to detail and ensuring a secure and comfortable fit for each component.
From base layers to protective cups, shin guards to jerseys, helmets to mouthguards, every piece contributes to the overall safety and experience of the player. Properly fitted gear allows for unhindered movement, optimal grip, and necessary impact absorption, enabling players to focus on the game without worrying about their safety.
It is equally important to maintain hockey gear to ensure its longevity and effectiveness.
Regular inspection, cleaning, and timely replacement of damaged or worn-out equipment are crucial steps in ensuring ongoing protection and performance. By taking care of their gear, players can continue to enjoy the game while minimizing the risk of compromised safety.
So, as players step out onto the ice, they can embrace the exhilaration of the game, knowing that they are properly equipped to handle its demands.
With the right gear worn correctly, players can channel their skills, strategy, and speed while staying protected. Ultimately, the combination of skill, dedication, and the right gear creates a winning formula for an enjoyable and safe hockey experience.
So, gear up, step onto the ice, and let the passion for the game drive you to new heights while being confidently protected by your correctly worn hockey gear.
Get out there, and have fun playing hockey!
5 Fun Facts About Hockey, some useful FAQs, and Glossary
- The Stanley Cup, awarded annually to the National Hockey League (NHL) champion, is the oldest professional sports trophy in North America. It was first awarded in 1893 and has a rich history and tradition in the world of hockey.
- The fastest slapshot ever recorded in an NHL All-Star Game was achieved by Zdeno Chara, a defenseman for the Boston Bruins. In 2012, Chara blasted a slapshot that reached a speed of 108.8 miles per hour (175.1 kilometers per hour), earning him a place in the Guinness World Records.
- Wayne Gretzky, often referred to as “The Great One,” holds numerous records in the NHL. One of his most impressive records is the all-time leading scorer in NHL history, with a staggering 2,857 career points. Gretzky’s records and achievements solidify his status as one of the greatest players in the history of the sport.
- The longest game in NHL history occurred on March 24-25, 1936, between the Detroit Red Wings and the Montreal Maroons. The game lasted for 176 minutes and 30 seconds of playtime, with Detroit eventually emerging victorious with a 1-0 win.
- Ice hockey has its origins in ancient times. A game similar to hockey was played in Egypt over 4,000 years ago. The game, known as “shinty,” involved using a stick to hit a ball made of tightly wrapped animal hair. Over the centuries, the sport evolved into various forms, eventually leading to the modern game of ice hockey that we know today.
FAQs About How to Wear Hockey Gear
Can I wear any type of gloves for a hockey game?
A: No, it’s essential to wear hockey-specific gloves. They are designed to provide the necessary protection from pucks, sticks, and skates while allowing flexibility for handling the stick. Regular gloves will not offer the same level of protection or flexibility.
What should I look for when buying a hockey helmet?
A: When buying a hockey helmet, ensure that it is of the right size and offers a snug fit. It should sit one finger width above your eyebrows. Look for helmets that are certified by safety standards organizations like the CSA, HECC, or EN1078. Also, consider helmets with a full-face cage or shield for added protection.
How often should I replace my hockey gear?
A: The frequency of replacement depends on the usage and condition of the gear. As a rule of thumb, protective gear like helmets, shoulder pads, elbow pads, gloves, and shin guards should be replaced when they show signs of wear and tear or no longer fit correctly. Skates generally last longer but should be replaced when they become uncomfortable or if the blade is worn down. Always replace your mouthguard each season or sooner if it becomes worn out.
Can I use second-hand hockey gear?
A: While it’s possible to use second-hand gear, it’s crucial to check the condition of each piece. The gear should not show significant signs of wear and tear and should fit correctly. It’s generally recommended to buy new helmets and mouthguards even if the rest of the gear is second-hand for safety reasons.
How should I clean my hockey gear?
A: Fresh Gear Sanitizing Machines keep hockey gear dry, sanitized and deodorized in 30 minutes.
…but not everyone lives near a Fresh Gear sanitizing center.
So here’s an alternative method:
Most hockey gear can be cleaned with mild soap and warm water. It’s important to air dry the gear after cleaning, not machine dry. Some equipment like hockey gloves and skates should not be submerged in water and can be cleaned with a damp cloth instead. Always refer to the manufacturer’s instructions for specific cleaning guidelines.
Can I use roller hockey gear for ice hockey and vice versa?
A: While some pieces of equipment like helmets, gloves, and protective pads might be similar for both roller and ice hockey, others are specific to the type of hockey. For instance, roller hockey uses inline skates, and ice hockey uses ice skates. Also, the pants for ice hockey are typically more padded than those for roller hockey due to the differences in playing surfaces.
Do I need to wear a neck guard when playing hockey?
A: While not all leagues require it, it’s highly recommended to wear a neck guard. This piece of equipment protects against skate cuts and puck impacts to the neck area, which can be very dangerous.
My helmet doesn’t have a face shield. Should I get one?
A: Yes, it’s advisable to have a face shield or cage on your helmet. This will protect your face from high-speed pucks, sticks, and possible collisions with other players or the ice.
What size hockey stick should I use?
A: The length of your hockey stick depends on your height and playing style. Generally, when standing in your skates, the stick should reach between your chin and your nose. However, defensemen prefer longer sticks for better reach, while forwards prefer shorter sticks for better puck handling.
Are there any specific materials to look for when choosing hockey gear?
A: High-quality hockey gear is typically made from strong, lightweight materials that can withstand impact. For instance, helmets often use a combination of plastic and foam for protection and comfort. Pads may use a mix of foam, plastic, and sometimes even Kevlar for added protection. Look for gear that balances protection, comfort, and mobility.
Glossary of Hockey Terms Used in the Article:
- Ice hockey: A fast-paced team sport played on ice, involving players using sticks to shoot a puck into the opposing team’s net.
- Protective equipment: Gear worn by hockey players to provide protection against injuries during gameplay.
- Helmet: A protective headgear worn by players to protect against head injuries from falls or puck impacts.
- Shoulder pads: Protective gear that shields the upper body, specifically the shoulders and chest, from impacts.
- Elbow pads: Protective gear that guards the elbows against injuries during falls or collisions.
- Gloves: Protective handwear that offers grip for handling the stick and protects the hands.
- Hockey pants or breezers: Protective pants that safeguard the lower body, including the hips and thighs.
- Shin guards: Protective gear worn on the shins to protect against puck impacts and skate blades.
- Skates: Footwear designed specifically for ice hockey that enables movement on the ice.
- Hockey socks: Long socks worn over the shin guards and held in place by a garter belt.
- Sweater or Jersey: A shirt worn by players representing their team and displaying team colors.
- Mouthguard: A protective device worn over the teeth to shield against dental injuries and reduce the risk of concussions.
- Hockey stick: A long, curved stick used by players to handle and shoot the puck.
- Base layers: Tight-fitting garments worn under the hockey gear to provide warmth and moisture-wicking properties.
- Protective cup (Jock or Jill): A piece of equipment worn by players to protect the groin area.
- Garter belt: A belt worn to hold up the hockey socks and keep them in place.
- Cage: A protective face shield made of metal wires, attached to the helmet to shield the face.
- Face shield: A protective shield made of clear plastic, attached to the helmet to shield the face.
- Bacterial growth: The growth and multiplication of bacteria, which can cause odors and health risks.
- Maintenance: Regular care and upkeep of hockey gear to ensure its effectiveness and longevity.
