

Honeywell Fans are a popular choice for homeowners and businesses alike, offering efficient cooling in a compact, space-saving design.
They feature multiple speed settings, oscillation options, and some models even include air filtration systems.
Despite their sleek and modern appearance, like all fans, they can accumulate dust and require regular cleaning to maintain optimal performance.
1.2 Importance of Regular Cleaning
Regular cleaning of your Honeywell Tower Fan is essential for several reasons. Firstly, dust accumulation can hinder the fan’s performance, reducing its efficiency and potentially leading to overheating. Secondly, a dusty fan can circulate allergens and pollutants in your home, negatively affecting the air quality. Finally, regular cleaning prolongs the fan’s life, ensuring you get the most from your investment.
Safety Precautions
2.1 Power Off and Unplug the Fan
Before starting the cleaning process, always switch off the fan and unplug it from the power source. This will prevent any accidental activation that could result in injury or damage to the fan.
2.2 Allow Sufficient Cooling Time
If you’ve been using the fan, wait for it to cool down before starting to clean. This is especially important for the motor area, which can get hot during operation.
2.3 Use Appropriate Cleaning Tools
You’ll need a few tools for cleaning, including a soft cloth, a dust brush or vacuum with a brush attachment, and possibly a screwdriver for disassembling parts of the fan. Avoid using harsh chemicals or excessive water, as they can damage the fan’s components.
Cleaning the Exterior
3.1 Dusting the Outer Surface
Start by dusting the outer surface of the fan. Use a soft cloth or a dust brush to gently wipe away any loose dust or debris. Avoid using a damp cloth on the fan’s body, as moisture can seep into the interior and cause damage.
3.2 Removing Stains or Spills
If there are any stains or spills on the fan’s exterior, they can usually be removed with a slightly damp cloth. Always dry the area thoroughly after cleaning to prevent moisture damage.
3.3 Cleaning the Control Panel and Display
The control panel and display should be cleaned with a dry cloth. Avoid using cleaning solutions or water, as they can cause damage. If necessary, you can use a slightly damp cloth, but make sure to dry the area completely afterwards.
Cleaning the Fan Blades
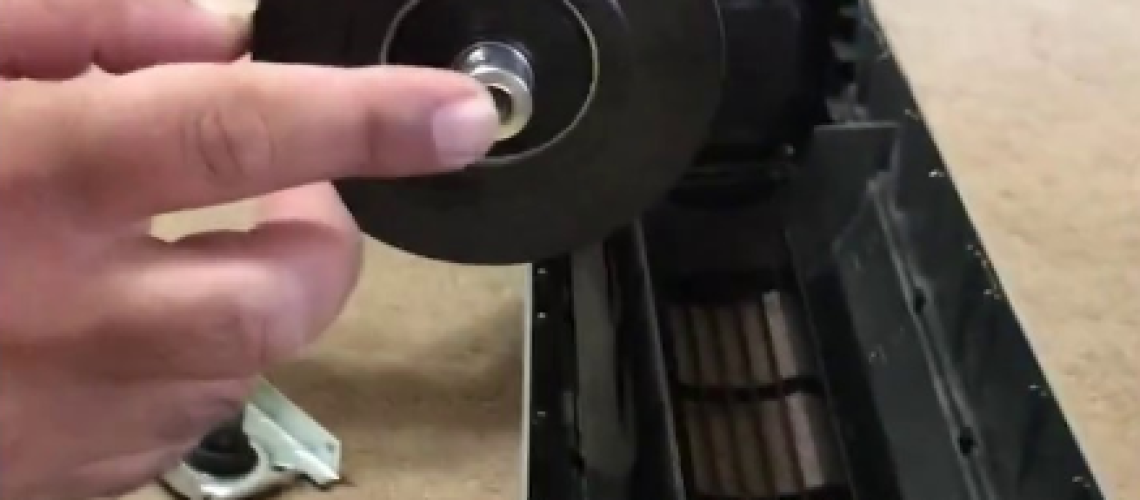
4.1 Removing the Front Grill
Before you can clean the fan blades, you’ll need to remove the front grill. This usually involves unscrewing a few screws or unclipping some clips. Refer to your user manual for specific instructions for your model.
4.2 Dusting and Wiping the Fan Blades
Once the front grill is removed, use a soft cloth or dust brush to remove any dust from the fan blades. If the dust is stubborn, you can use a slightly damp cloth, but be sure to dry the blades thoroughly afterwards.
4.3 Using a Vacuum or Compressed Air
In some cases, it may be easier to use a vacuum or a can of compressed air to remove dust from the fan blades and interior of the fan. If you choose this method, be gentle to avoid damaging the blades or other components.
Cleaning the Filter
5.1 Locating the Filter
If your Honeywell Tower Fan model includes an air filter, it’s typically located at the back of the fan. You’ll need to remove the filter cover, which may require unscrewing or unclipping it.
5.2 Removing and Cleaning the Filter
Once you’ve located the filter, carefully remove it. Depending on the model, the filter may be reusable and require cleaning, or it may need to be replaced. If it’s reusable, clean it gently with a vacuum or warm soapy water, and allow it to dry completely before reinstalling it.
5.3 Reinstalling the Filter
After the filter has been cleaned and is completely dry, you can reinstall it in the fan. Make sure it fits securely and the filter cover is properly attached.
Cleaning the Base and Stand
6.1 Wiping Down the Base and Stand
The base and stand of your Honeywell Tower Fan can also accumulate dust and should be cleaned regularly. Use a dry cloth to dust them, or a slightly damp cloth for more stubborn dirt. Remember to dry them thoroughly if you use a damp cloth.
6.2 Removing Accumulated Dust or Debris
Check the base and stand for any accumulated dust or debris, particularly in any crevices. This can often be removed with a soft brush or cloth. In some cases, a vacuum with a brush attachment can be useful for this task.
Reassembling and Testing
7.1 Putting the Fan Back Together
After all the parts have been cleaned and are completely dry, you can reassemble your Honeywell Tower Fan. Follow the disassembly steps in reverse, making sure that all parts are secure and properly positioned.
7.2 Performing a Test Run
Once the fan is reassembled, plug it in and perform a test run. Check that the fan operates correctly at all speed settings, and that the oscillation function, if available, works properly. Make sure there are no unusual noises or vibrations.
Additional Tips for Maintenance
8.1 Regular Cleaning Schedule
To keep your Honeywell Tower Fan operating at its best, establish a regular cleaning schedule. This will depend on how often you use the fan and the dust levels in your home, but generally, the fan should be cleaned at least once every two to three months.
8.2 Maintaining Proper Airflow
Always ensure there’s sufficient space around your fan for proper airflow. Avoid placing it too close to walls, furniture, or other objects that can obstruct the air intake or output.
8.3 Storage and Off-Season Maintenance
If you won’t be using the fan for an extended period, consider cleaning it thoroughly before storing it. Store the fan in a dry, dust-free area, and cover it to protect it from dust accumulation.
Conclusion
Regular cleaning of your Honeywell Fan not only ensures efficient operation but also improves the air quality in your home and prolongs the fan’s life.
By following the simple steps outlined in this guide, you can keep your fan in top condition and enjoy its cooling benefits for many years to come.
